The wall hanging is almost complete. I finished the binding tonight and it is currently in the wash becoming fabulous (I hope!). It has taken me a little while to finish this off, longer than I wanted it to but I have been tired the last few nights getting home from work and only worked on it a little bit so really didn't have anything to post until now. I finished the sewing and I cut the rows as I did in the chenille quilt so I won't bore you with going over those steps or how to make binding. The only difference in binding is that I only did the single fold binding and I sewed the binding to the back, flipped it over and did a decorative stitch on the front side. I am going to walk you through the steps for making the corner when sewing it on the back, something I didn't have to do on the chenille quilt because it had the curved corners and we did the double fold, one seam binding.
So, with the single fold binding you place the raw edge of the binding closest to the edge of the quilt and sew it to the back with 1/4" seam allowance. You leave about 6" tail at the beginning and you start in the middle of one side. Sew the binding to the first corner and then take the quilt out of the machine. To turn the corner we take the binding and fold it to the right forming a 90 degree angle, then fold the binding back over the top of the 90 degree angle and you will have turned the corner, the raw edge of the binding should be laying on the next edge you are going to sew, sew to the next corner and do the above step again. When you get back to where you start stop sewing until you have about 6" to go. Take the quilt out of the machine. You will join the two ends with a mitre as we used when making the binding strips (I am not showing this step here). once you have the mitered joint complete put the quilt back in the machine and sew the rest of the binding onto the quilt.

Here is the quilt in the machine sewing the binding up to the corner. Take quilt out of machine.
Here is the quilt out of the machine. The binding is going straight down.
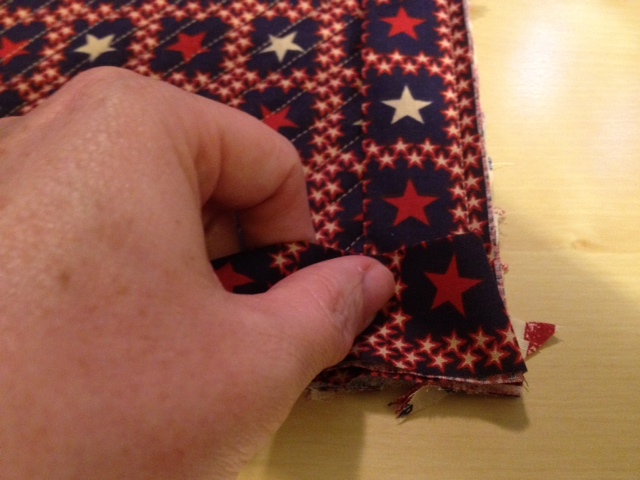
Take the binding and fold up to the 90 degree angle. The binding is now out to the right of the quilt.
Now take the binding and fold back over the 90 degree angle. The binding is now to the left and along the next edge to be sewn.
Okay, now we have the binding on the back side. Now we fold it over to the front side (next 3 photos)
This photo shows the finished binding. I normally use a decorative stitch on the front this time I used a blanket stitch which I think kind of gives it a rustic/country/homespun look. Doing the binding this way is kind of a cheat way to do it. If you were making a quilt that you wanted to show or sale you would do the reverse of what I have done when sewing the binding on. You would sew the binding on to the front and fold to the back and then hand stitch the binding to the back. Since I am not showing or selling these quilts I am going to take the easy route, plus my hand stitching isn't that good so I would rather make sure the binding is going to stay on versus the back of the binding falling off because of my bad hand stitching.
This picture is showing the complete quilt before washing. Once I have it washed and dried, I will post a picture of it.


No comments:
Post a Comment